

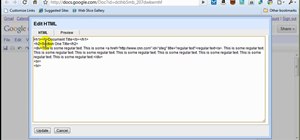
In this how to video, you will learn how to style documents with the Google Docs CSS editor. First, create a new document in Google Docs. First, click on the drop down menu for style. Type in a title in the document. Select heading 2 in the menu and type in the section title. Next, take off the style and type in the body for the content. Select some of the body text and click the hyperlink button. Type in the address and click okay. Now you can click this text to go to a website. Go to file and rename and click okay. You have limited web page control, such as editing HTML. Select the top text and set it to heading 1. Go to edit and edit HTML to see the h1 tag. You will see a bold tag in here, which is known to be buggy. You can remove it if you want. If you know cascading style sheets, go to edit and select edit CSS. From here, enter h1{text-align: right border-bottom: 2px solid blue; font-style: italic; font-weight: normal;}. Go back and see how the page has changed. Select the body text and change the style to the paragraph style. Go to edit and edit CSS to make a CSS rule for paragraphs. Type in p {text-indent: 2em;} to create an indentation. You can go to the share option and select publish as web page. Click automatically republish every time changes are made. People can view this now. You can also invite people to view the file if you know their e-mail. You now know the basics of Google Docs and CSS editing.
Just updated your iPhone? You'll find new emoji, enhanced security, podcast transcripts, Apple Cash virtual numbers, and other useful features. There are even new additions hidden within Safari. Find out what's new and changed on your iPhone with the iOS 17.4 update.


Be the First to Comment
Share Your Thoughts